一. 创建评论栏目
- 在ucms后台创建文章栏目,名称为评论,修改数据表为不同的名称,如我的为“dazeng_comment”,栏目地址为“/comment.php”,模板文件为“comment.php”,并将“导航栏显示”前的勾去掉;
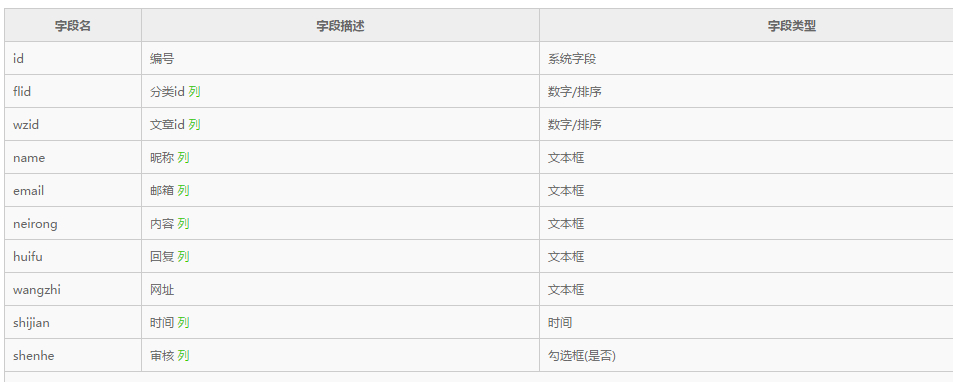
- 点击字符段管理,添加字符段,这里可以根据你自身情况添加不同的字符段,我的见下图:

其中flid(分类id)和wzid(文章id)必不可少。
二、发表评论模板
<form action="{uri(/comment.php)}" method="post" id="commentform" class="comment-form">


<div style="display:none;">

<input type="text" name="flid" value="{$article[cid]}" /><input type="text" name="wzid" value="{$article[id]}" />{//因为这两个参数不需要用户输入,所以选择隐藏}

</div>

<textarea placeholder="文明和谐评论" name="comment" rows="5"></textarea> <input placeholder="昵称" name="comname" type="text" size="30" /> <input placeholder="邮箱" name="commail" type="text" size="30" /> <input placeholder="网站" name="comurl" type="text" size="30" /> <input name="submit" type="submit" value="发表评论" />

</form>
三、发表提交后的操作代码(即模板comment.php)
{if isset($_POST["comname"])}

{$set=array()}{//这一行开始判断以前是否评论过且通过审核,判断的依据是数据库中是否存在评论人的email,该email通过审核的评论数是否为0}

{$set['cid']=6}{//这里的6是你评论栏目的cid}

{$set['where']['email']=$_POST['commail']}

{$set['pagesize']=1}

{$set['where']['shenhe']=1}

{$articles=alist($set)}

{if count($articles['list'])!=0}

     {$shenhe=1}

{else}

     {$shenhe=0}

{/if}{//直到这儿结束是否评论过且通过审核的判断}


    {$newarticle=array()}

    {$newarticle['cid']=6}

    {$newarticle['name']=$_POST["comname"]}

    {$newarticle['email']=$_POST["commail"]}

    {$newarticle['wangzhi']=$_POST["comurl"]}

    {$newarticle['neirong']=$_POST["comment"]}

    {$newarticle['flid']=$_POST["flid"]}

    {$newarticle['wzid']=$_POST["wzid"]}

    {$newarticle['shenhe']=$shenhe}

    {$id=ainsert($newarticle)}

    {if $id>0}

{//以上代码没有难度,完全来自官方,需要注意$post['名称']里面的名称必须与发表评论代码中的一致}

{//以下代码是判断跳转的页面地址,就是发表评论的那篇文章的地址,这种方法需要不具备通性,还有一种判断方法,待会儿在侧边栏显示最新评论那儿会讲}

    {if $_POST["flid"]==1}

{$fl='Logs'}

{elseif $_POST["flid"]==2}

{$fl='Articles'}

{elseif $_POST["flid"]==3}

{$fl='Works'}

{else}

{/if}

{$url='/'.$fl.'/'.$_POST["wzid"].'.html';}

<meta http-equiv="refresh" content="1; url=<?php echo $url;?>#comments" />

<p style="text-align:center;">

<strong>评论成功{if $shenhe=="1"}并通过审核{else}等待审核{/if}。 </strong>

</p>

{else}

<p style="text-align:center;">

<strong>评论失败,请检查留言内容。<a href="javascript:void(history.back())">返回修改</a></strong>

</p>

{/if}

{else}

{notfound()}

{/if}
四、显示评论
<ol class="comment-list">

{$set=array()}

{$set['cid']='6'}{//同样是评论栏目的cid}

{$set['where']['flid']=$article['cid']}

{$set['where']['wzid']=$article['id']}

{$set['where']['shenhe']=1}{//只通过审核通过的评论}

{$articles=alist($set)}

{loop $articles['list'] as $a}

{$grav_url = "https://www.gravatar.com/avatar/".md5(strtolower(trim($a[email])));}{//显示gravatar头像}

<li id="comment-{$a['id']}" class="comment depth-1 parent odd">


<div class="comment-body">


<div class="comment-author vcard">

<img alt="" src="{$grav_url}" class="avatar avatar-50 photo" height="50" width="50" /><cite class="fn"><a href="{$a['wangzhi']}" target="_blank" title="{$a['name']}">{$a['name']}</a></cite><span class="says">说道:</span>

</div>


<div class="comment-meta commentmetadata">

<a>{$a['shijian']|date('Y-m-d H:i:s',this)}</a>

</div>


<p>{$a['neirong']}</p>

{if $a['huifu']}<p style="color:#be0000;display:block;margin-left:2em;">Dazeng回复:{$a['huifu']}</p>{/if}

</div>

</li>

{/loop}

</ol>
五、侧边栏显示最新评论
{$set=array()}

{$set['cid']=6}{//同样是评论栏目的cid}

{$set['pagesize']=8}{//显示条数}

{$set['where']['shenhe']=1}{//显示已经审核的}

{$articles=alist($set)}

{loop $articles['list'] as $a}

{//以下就是判断的第二种方法,这种方法更好,具有通用性呵呵}

<a class="list-group-item " href="

{$set=array()}

{$set['cid']=$a['flid']}

{$set['where']['id']=$a['wzid']}

{$set['all']=0}{$fromarticle=a($set)}

{if $fromarticle}{$fromarticle['link']}

{/if}

" title="{$a['name']}:{$a['neirong']}" ><i class="fa fa-comments-o"></i>{$a['name']}:{$a['neirong']|text(20)}...</a>

{/loop}
UCMS增加评论差不多就这样,但以上不适合单页栏目的评论,单页栏目的评论可以将以上的所有涉及到文章id的都去掉,单独搞一套就OK了,当然也可以合并起来,增加一点判断就可以了.
非原创转自原文链接